Signs It Is Time to Repot Your Herb
| Symptom | Visual Cue | What It Means |
|---|---|---|
| Roots escaping out the bottom | Roots growing out of the drainage holes | The plant has physically maxed out the available space and needs a larger container. |
| Hydrophobic Soil | Water instantly pours down the sides of the pot and out the bottom | The pot is 90% roots and 10% soil. There is no dirt left to hold the moisture. |
| Top-Heavy Tipping | The plant falls over in a minor breeze | The canopy is outgrowing the base. It needs a heavier pot (like Terracotta) and a wider base. |
| Stunted Growth | Despite fertilizing and good light, it stops growing entirely | The roots are 'root bound' (circling the pot infinitely) and cannot expand to support new leaf growth. |
When you buy a flourishing basil plant from the supermarket, it is usually crammed into a tiny, flimsy plastic sleeve. You bring it home, rip the plastic off, tear the densely packed root ball in half to “loosen it up,” shove it into a giant decorative pot, and drench it in water.
Three days later, the plant collapses into a black, wilted, dead puddle.
This is the classic story of Transplant Shock. Repotting a plant is the botanical equivalent of open-heart surgery. It is a highly stressful event. However, if you follow a few basic rules regarding pot sizing, root handling, and soil choice, repotting should trigger a massive, luxurious explosion of new growth.
Here is exactly how to upgrade your indoor herbs safely.
Rule 1: Never Over-Pot
The most common beginner mistake is moving a plant from a 4-inch nursery pot directly into a massive 12-inch ceramic planter. The logic seems sound: “I’ll give it plenty of room to grow!”
This is fatal. When a small plant goes into a massive pot, its tiny root system can only drink the water in its immediate vicinity. The other 8 inches of wet soil surrounding the roots sit completely stagnant. The water never evaporates, oxygen is pushed out, and the soil quickly turns anaerobic. The roots will rot away in days.
The Golden Rule: Only move a plant up one size at a time. If your herb is currently in a 4-inch pot, move it to a 6-inch pot. (For an exhaustive visual breakdown, read our Herb Pot Size Guide).
Rule 2: Choose the Right Materials
Before you begin surgery, you need to prepare the operating room. What kind of pot and soil are you using?
- The Material: Are you repotting a moisture-loving mint or a dry-loving rosemary? As discussed in Plastic vs. Terracotta Pots: Which Makes Care Easier?, put drought-tolerant Mediterranean herbs in breathable clay, and thirsty leafy herbs in plastic or self-watering pots.
- The Soil: Never fill the new pot with dirt from an outdoor garden bed. You must use a light, fluffy, well-aerated indoor potting mix. Review Potting Mix vs. Raised Bed Soil for Herb Containers if you are unsure why outdoor soil suffocates indoor roots.
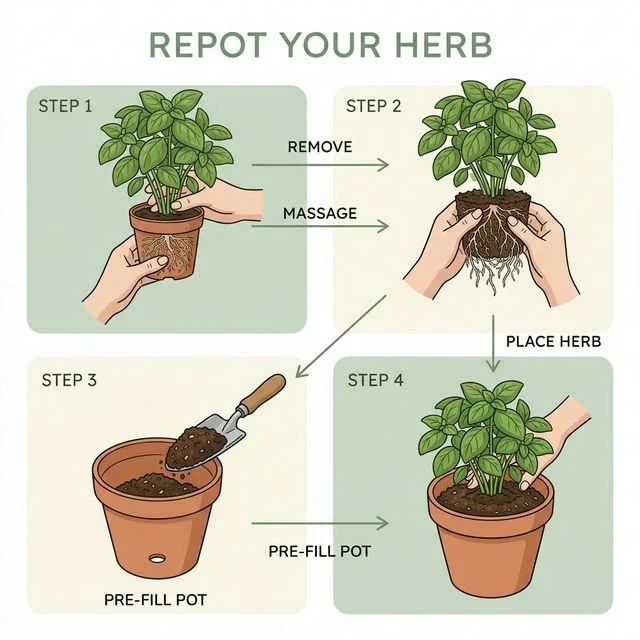
The Step-by-Step Repotting Method
Assuming you have a pot that is 2 inches larger and a bag of premium, perlite-heavy potting mix, here is the stress-free way to make the transfer.
1. Hydrate the Patient (Day Before)
A dry, brittle root snaps instantly when pulled. A fully hydrated root is flexible and tough. Thoroughly water your herb 24 hours before you plan to repot it.
2. Pre-fill the New Pot
Take your new, larger pot and fill the bottom third of it with your fresh potting mix. Tamp it down lightly—do not pack it into concrete.
3. The Gentle Extraction
Place your hand over the top of the old pot, keeping the main stem of the herb gently sandwiched between your fingers. Turn the pot completely upside down. Do not pull the plant by the stem. Instead, squeeze the sides of the plastic pot until the root ball slides smoothly out into your hand.
4. Massage the Roots (No Tearing)
If the roots are aggressively circling the bottom of the dirt (root-bound), they need encouragement to spread outward in their new home. Do not take scissors and hack the bottom off. Do not rip the roots apart angrily. Use the pads of your thumbs to gently massage the bottom edges of the root ball, lightly teasing the lowest roots down and outward.
5. Position and Backfill
Place the plant into the center of the new pot. The base of the main stem (where it meets the soil) should rest roughly half an inch below the rim of the new pot. If it is sitting too low, add more soil underneath. If it is popping out above the rim, remove some soil.
Once it is perfectly level, gently backfill the empty gap around the sides of the root ball with fresh potting mix.
6. The Settling Water
Immediately water the pot until liquid flows freely out the bottom drainage holes. This is not just to give the plant a drink; this water physically settles the fresh dirt, collapsing any massive, dry air pockets around the fragile roots.
Post-Op Recovery Care
The plant has just undergone major trauma. Its roots are slightly damaged and need time to heal before they can efficiently pump water back up to the canopy.
- Keep the plant out of blazing, intense direct sunlight for 3 to 4 days. A shady, bright spot prevents the leaves from sweating out water faster than the damaged roots can replace it.
- Do not fertilize. We repeat: Do not pour liquid fertilizer over wounded, surgical roots. Wait a month.
Within a week, the plant will push its roots into the expansive new soil profile, establish a massive new infrastructure, and reward you with rapid, explosive vertical growth.
Troubleshooting post-repotting issues?
If your plant is heavily wilting or turning yellow after a recent move, these guides will help you diagnose the soil and watering problems.
Common questions
Should I put rocks or gravel at the bottom of the new pot for drainage?
Do not do this. Putting rocks at the bottom of a pot creates a "perched water table," which essentially forces water to pool up directly beneath the roots instead of draining out. Use a pot with actual drainage holes and fill it entirely with potting mix.
Should I fertilize immediately after repotting to help it grow?
Absolutely not. Fertilizing damaged roots will chemically burn them. Furthermore, fresh, high-quality potting mix usually contains enough nutrients for the first month. Wait at least 4 weeks before you resume fertilizing.
Is it normal for some leaves to drop after repotting?
Yes, a minor amount of bottom leaf yellowing or drop is normal as the plant expends all its energy repairing its root system instead of maintaining its oldest foliage. If the entire plant collapses, however, you have severe transplant shock.
Related guides
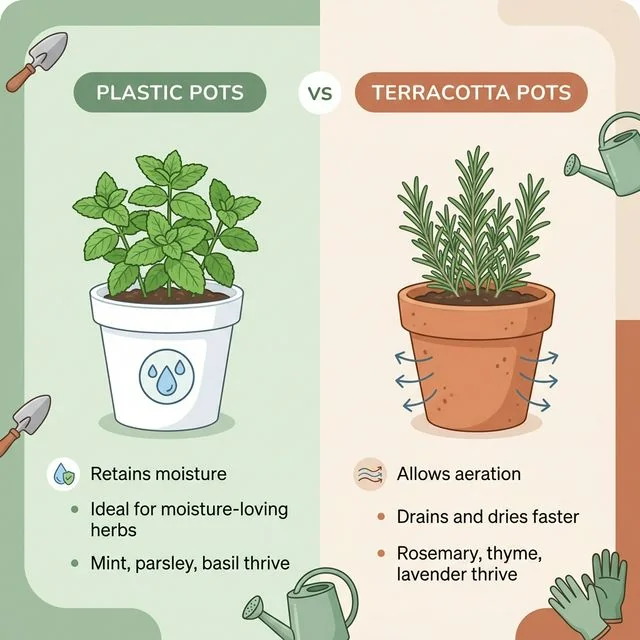
Plastic vs. Terracotta Pots for Herbs: Which Makes Care Easier?
The material of your pot dictates how fast your soil dries out. If you put a thirsty mint plant in unglazed terracotta, you will be watering every single day. If you put rot-prone rosemary in a plastic pot, you must be extremely careful.
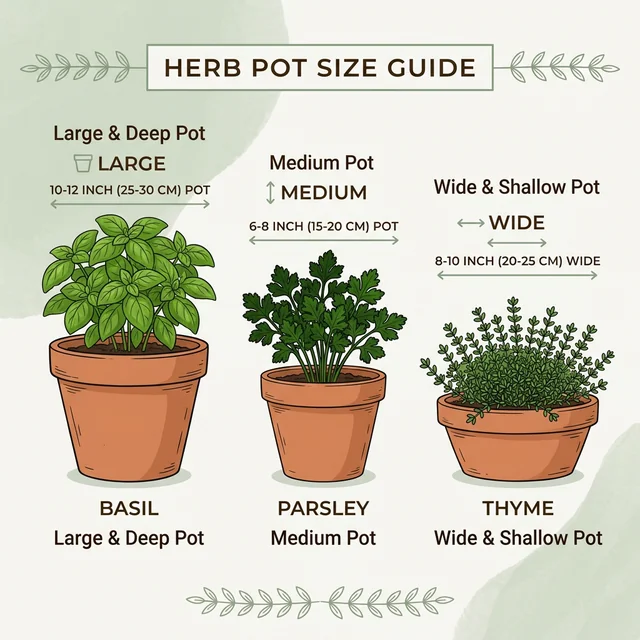
Herb Pot Size Guide: Best Pot Sizes for Basil, Mint, Parsley, Thyme, and Chives
Stop suffocating your herbs in tiny decorative cups. This guide breaks down the exact container sizes needed for the most common indoor and balcony herbs.
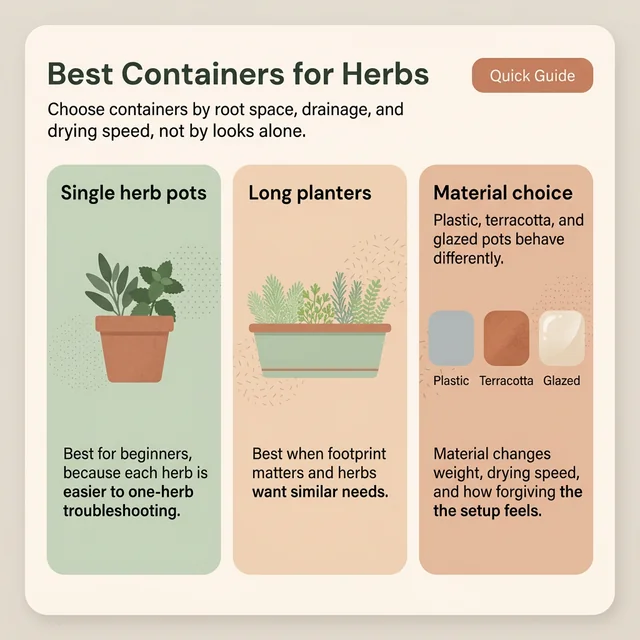
Best Containers for Herbs: Pot Size, Drainage, and Material Guide
A practical guide to selecting herb containers that make watering easier, reduce root problems, and actually suit apartments, balconies, and windowsills.