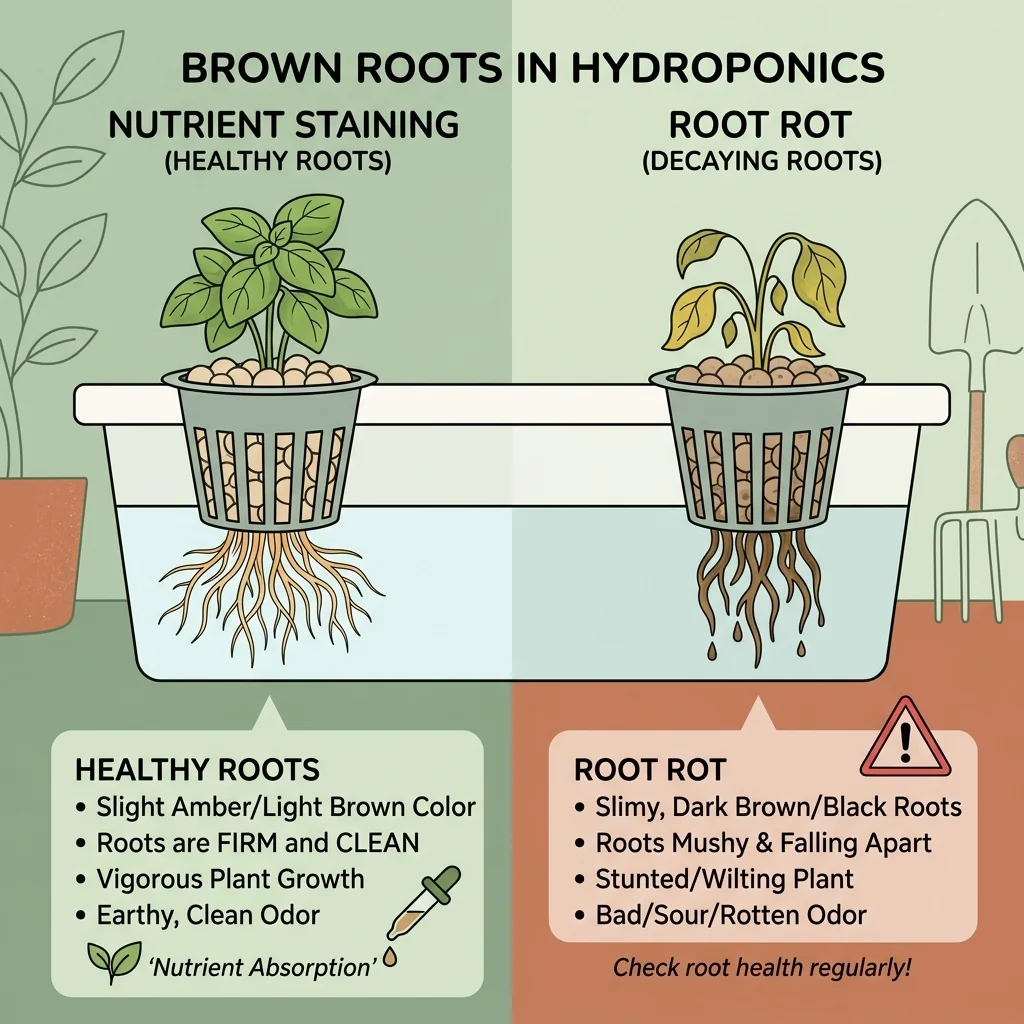
Is It Nutrient Staining or Root Rot?
| Diagnostic Test | Nutrient Staining (Healthy) | Root Rot (Deadly Infection) |
|---|---|---|
| The Texture Test | Firm, springy, and structurally strong. Roots do not tear easily. | Mushy, soft, slimy, and fragile. They fall apart at the touch. |
| The Sloughing Test | The root sheath remains tightly bound to the inner core. | The outer root sleeve slides completely off the central strand like wet paper. |
| The Smell Test | Smells clean, earthy, or slightly like mild pond water. | Smells sour, rotten, swampy, or like decaying sewage. |
| The Growth Rate | Plants remain vigorous, vibrant green, and actively grow. | Plants wilt during the day, stunt, turn yellow, and die. |
Every hydroponic grower experiences a moment of dread when they lift their net cups and see that their once-pearly-white root system has turned brown.
The first instinct is panic: “My system has root rot. I need to dump everything and bleach the pipes.”
But before you execute an emergency system reset, take a deep breath. Not all brown roots are diseased. In fact, many perfectly healthy hydroponic systems have tan or amber-stained roots. Certain organic nutrient lines, humic acids, and concentrated iron chelates will dye healthy plant tissue within days.
Knowing the difference between harmless Nutrient Staining and deadly Root Rot is the single most important diagnostic skill in water-based gardening. Here is the step-by-step framework to determine exactly what is happening in your reservoir.
The Direct Quick Answer
To tell nutrient staining from root rot in seconds, perform the Squeeze, Slide, and Smell tests.
Nutrient staining is harmless: the roots will feel firm, springy, and dry-to-the-touch. When gently pulled, they stay completely intact and emit a clean, earthy scent.
Root rot (caused by Pythium) is a biological crisis: the roots feel slimy, mushy, and wet. When you slide your fingers along a root, the outer sheath will easily slough off, leaving a bare thread. Most distinctively, root rot emits a foul, rotting sewage smell that you cannot miss.
The Root Diagnostic Checklist
If you are still unsure, run through this five-step physical diagnostic checklist.
1. The Squeeze Test (Texture)
Take a small bundle of the brown roots and gently pinch them between your thumb and forefinger.
- Stained Roots: Feel structurally sound. They have tension and will bounce back slightly when released, feeling much like thin, cooked spaghetti.
- Rotted Roots: Feel soft, squishy, and limp. They collapse entirely under the slightest pressure, resembling overcooked, mushy noodles.
2. The Slide Test (Sloughing)
Hold a single brown root strand between two fingers and gently pull downward toward the tip.
- Stained Roots: Stay unified. The entire root remains intact because the cell walls are healthy and rigid.
- Rotted Roots: Will “slough.” The slimy outer cortex of the root will slide completely off in your fingers, leaving behind a thin, hair-like central vascular core. This is a definitive sign that the root tissue has decayed.
3. The Smell Test (Odor)
Lower your face close to the roots and take a deep breath.
- Stained Roots: Smell clean, fresh, and slightly sweet—like freshly dug garden soil or clean rain.
- Rotted Roots: Smell sour, swampy, and foul. The decay of organic matter in anaerobic conditions produces hydrogen sulfide and other smelly gases that mimic sewage.
4. The Canopy Correlation (Top Growth)
Look closely at the leaves of the plant above the net cup.
- Stained Roots: Are fully functional. The plant above will look vibrant green, firm, and be growing rapidly.
- Rotted Roots: Can no longer drink water. The plant will show daytime wilting (even though it is sitting in water), develop Yellow Leaves, and exhibit severely stunted growth.
5. The Light/Pebble Factor
Look at the very top of the root mass, where the plant emerges from the net cup.
- Pebble Staining: If your clay pebbles (LECA) weren’t rinsed perfectly before setup, red-brown clay dust will settle onto the roots. This dust often accumulates right at the base of the cup, leaving the lower roots white. This is completely harmless.
- Algae vs. Staining: If light is leaking into your reservoir, you might see green or brown slimy threads. Algae is stringy and grows on top of the roots, whereas staining is a uniform change in the color of the root tissue itself.
Why Healthy Roots Turn Brown (Nutrient Staining)
If your roots passed the diagnostic tests with flying colors (firm, odorless, strong), you are dealing with harmless Nutrient Staining. There are three primary chemistry culprits that dye root cells:
1. Organic Nutrients and Additives
If your feeding regimen includes organic kelp extracts, seaweed extracts, humic acids, or fulvic acids, your roots will turn dark tan or brown. These compounds contain heavy, dark pigments that bond directly with the outer cellular membrane of the root.
2. Iron Chelates
Hydroponic plants require iron, which is supplied in chelated forms (like Fe-EDTA or Fe-DTPA) to keep it soluble. These iron complexes have a strong reddish-yellow or amber tint. Over time, as roots absorb iron, they develop a distinct rusty-tan coloration.
3. Clay Pebble Dust
As mentioned in How to Germinate Lettuce Seeds, new clay pebbles must be washed repeatedly. If dust remains, it will cycle through your system, coating the root fibers in a fine orange-brown layer that looks alarmingly like rot but is totally inert.
Stained roots do not need treatment. You can continue running your system normally.
How to Treat Root Rot (Emergency Rescue Plan)
If your roots failed the tests (slimy, smelly, mushy), you have an active infestation of Pythium. You must act immediately to save the crop.
Step 1: Clean and Trim
Remove the plants from the system. Bring them to a sink and gently rinse the root system under lukewarm tap water, washing away as much slime as possible. Use sterilized scissors to clip off the worst of the black, mushy root sections.
Step 2: System Sterilization
Drain the entire nutrient reservoir and flush the pipes or buckets. Fill the system with clean water and add a sterilizing agent.
- For Non-Organic Systems: Add 34% food-grade hydrogen peroxide at a rate of 1-2 mL per gallon of water, or use a chlorine-based root sterilizer. Run this through the system for 24 hours to kill all lingering spores.
- For Biological Systems: Instead of sterilizing, inoculate the fresh reservoir with beneficial microbes (like Bacillus amyloliquefaciens or Trichoderma). These friendly bacteria will actively consume the Pythium and protect root sites.
Step 3: Upgrade Aeration and Cool the Reservoir
Pythium only attacks when roots are starved of oxygen. Check your water temperature! If it is above 72°F (22°C), the water cannot hold oxygen, creating the perfect environment for rot. Review our Water Temperature Guide to keep your reservoir cool and drop in a larger air pump to maximize dissolved oxygen.
By knowing how to tell a harmless amber stain from a biological rot crisis, you will avoid unnecessary chemical cleanups and keep your hydroponic garden thriving.
Diagnosing other chemical imbalances?
Root problems are closely linked to temperature and water chemistry. Use these guides to stabilize your system.
Common questions
Can I wash the slime off rot-infected roots?
You can gently rinse infected roots in lukewarm water to remove loose slime, but this will not cure the disease. You must sanitize the reservoir and treat the roots with sterile agents like hydrogen peroxide.
Why do clay pebbles sometimes stain roots brown?
If LECA/clay pebbles are not thoroughly washed before use, they release fine red-brown dust. As water cycles, this dust coats healthy white roots, staining them a dusty orange-brown color.
How long can stained roots remain healthy?
Indefinitely. If the brown tint is purely from iron or organic nutrients, the plant will complete its entire growth cycle and yield perfectly without any issues.
Related guides
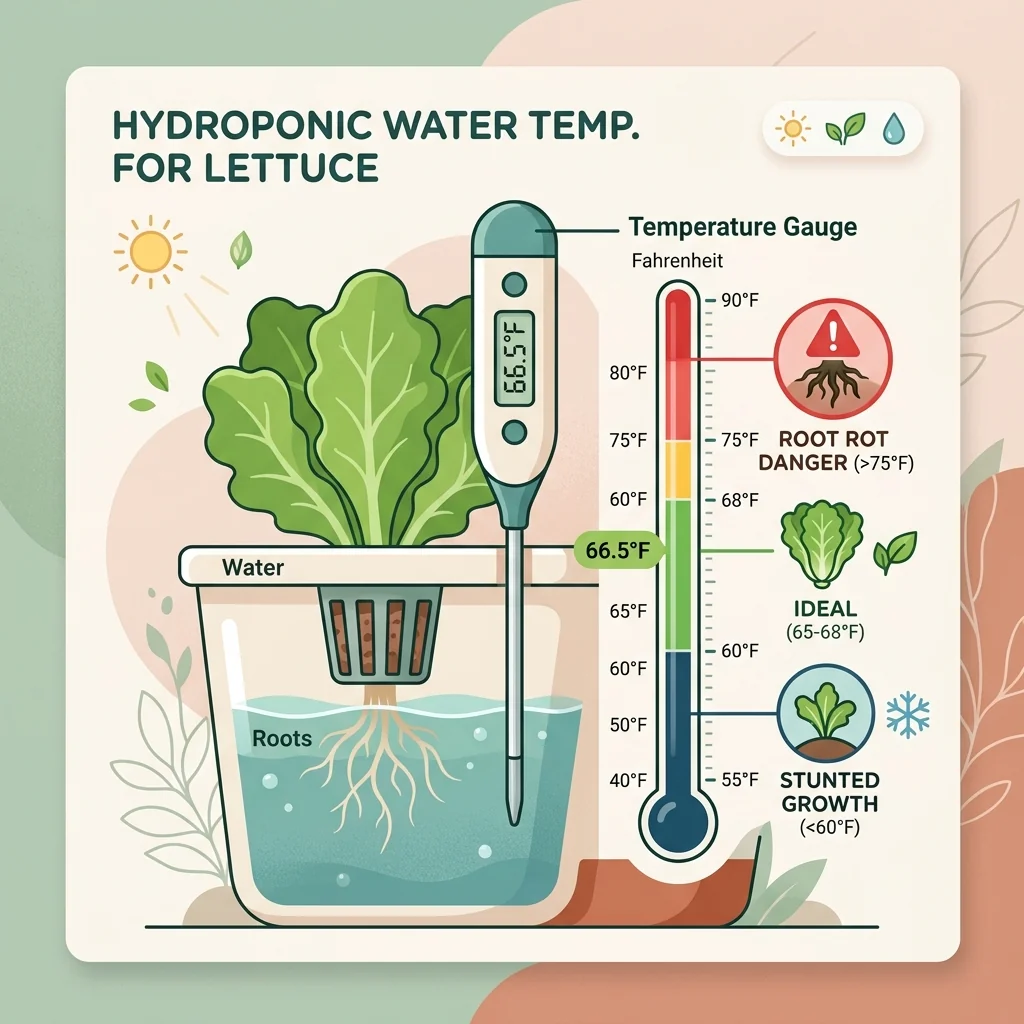
Hydroponic water temperature for lettuce: why 68°F is magic
You can have perfect pH, perfect nutrients, and a massive air pump. But if your hydroponic reservoir is sitting at 80°F, your lettuce is actively suffocating. Here is why water temperature dictates everything in hydroponics.
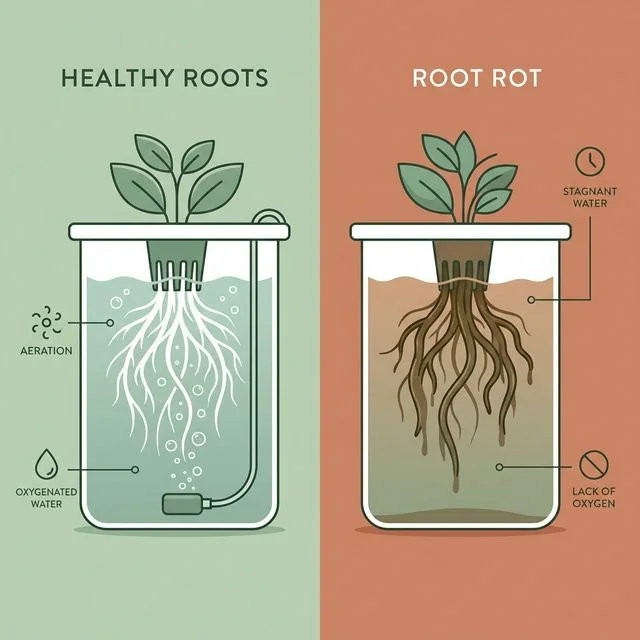
Hydroponic root rot: brown roots, slimy roots, and prevention
If your hydroponic roots look brown, feel slimy, or smell swampy, this guide helps you identify root rot early and fix the conditions causing it.
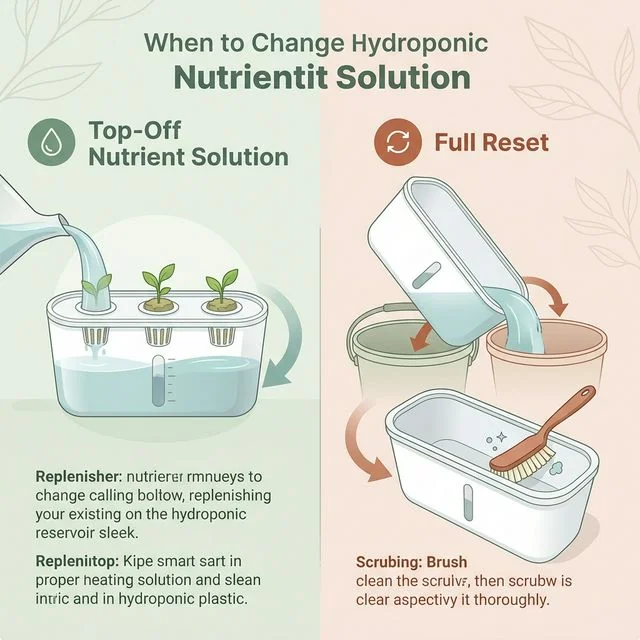
When to change hydroponic nutrient solution: top off vs full reset
A hydroponic reservoir should not be treated like a closed loop forever. This guide shows when a simple top off is enough and when a full reset is the safer move.